
Have you ever wondered why store-bought presents often feel so impersonal compared with items crafted by hand? Many people assume making professional-looking bundles is too difficult or expensive. However, homemade creations are actually much simpler than you might imagine.
By choosing specific items your friend loves, you turn simple gestures into customized masterpieces. This process simplifies everything including early planning and final presentation. You can easily create something meaningful and beautiful without any stress or high costs.
Whether you are beginners or seasoned pros, following the right instructions ensures your project looks stunning. It is time How to Build a Gift Basket From Scratch and impress your loved ones. Showing you care has never felt more rewarding or straightforward.
Key Takeaways
- Select unique themes based on the recipient’s personal interests.
- Pick sturdy containers that fit all your chosen items properly.
- This Gift Basket Tutorial emphasizes using quality fillers for stability.
- Arrange products by height to create appealing visual balance and depth.
- Following this Step by Step Guide guarantees a professional final look.
- Add handwritten notes or ribbons for that special personalized touch.
Understanding the Art of Gift Basket Creation
The art of gift basket creation is a nuanced process that involves personalization and attention to detail. Crafting a gift basket that resonates with the recipient requires a deep understanding of their preferences and the occasion.
What Makes a Gift Basket Special
A gift basket is more than just a collection of items; it’s a thoughtful and personalized gift that shows you care. What makes it special is the effort and thoughtfulness put into selecting items that are tailored to the recipient’s interests and preferences. As noted by gift-giving experts, “A well-crafted gift basket is a reflection of the giver’s personality and the recipient’s tastes.”
A DIY Gift Basket allows you to personalize it with the recipient’s favorite things, making it a truly unique gift. This personal touch is what sets a homemade gift basket apart from a standard, store-bought gift.
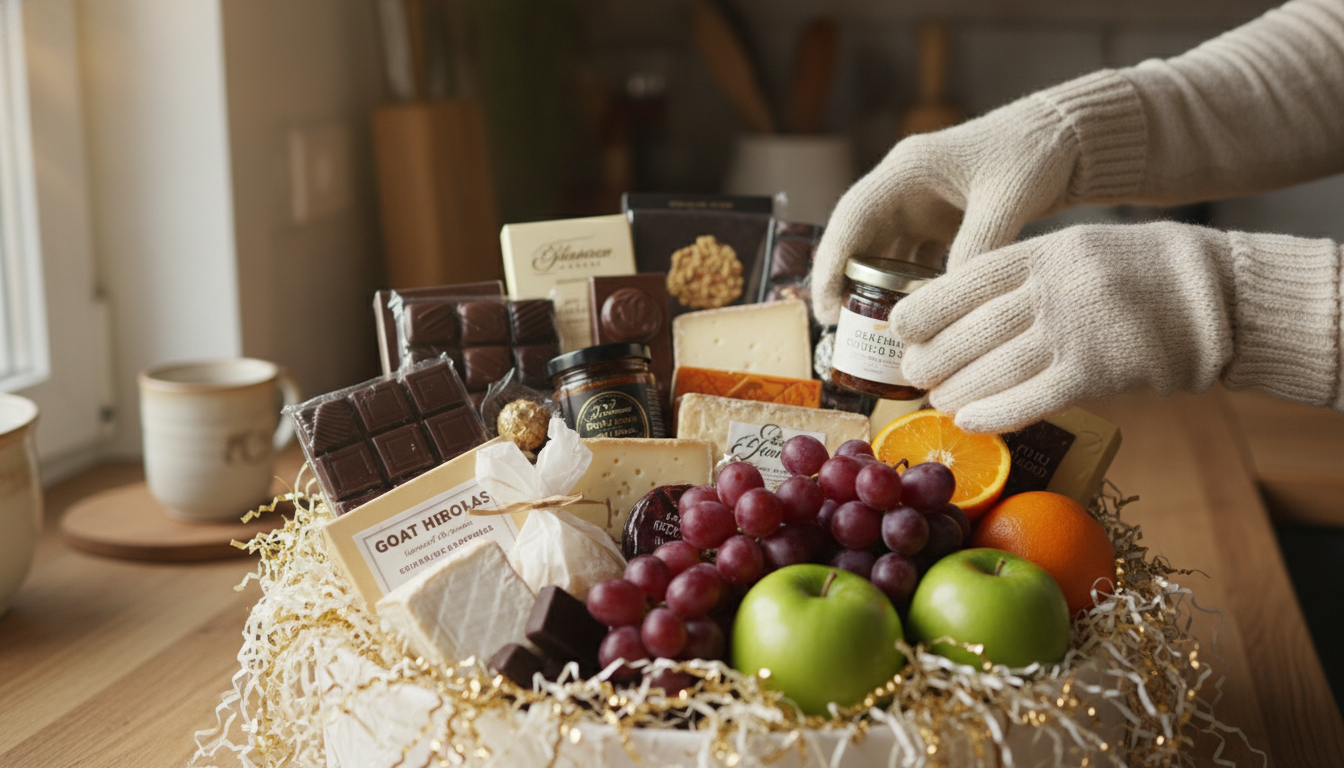
For instance, if the recipient enjoys gourmet foods, you can curate a basket filled with artisanal cheeses, crackers, and jams. The key is to tailor the contents to the recipient’s tastes and preferences.
Essential Elements of a Successful Gift Basket
Creating a successful gift basket involves several essential elements.
- Theme: Choosing a theme helps guide your selection of items and gives the gift basket a cohesive look.
- Quality Items: Including high-quality items that are relevant to the theme and the recipient’s interests.
- Presentation: The presentation of the gift basket is crucial. It should be visually appealing and well-arranged.
| Element | Description | Example |
|---|---|---|
| Theme | Gives the gift basket a cohesive look and guides item selection. | Gourmet Food, Spa Day, Movie Night |
| Quality Items | High-quality items relevant to the theme and recipient’s interests. | Artisanal cheeses, scented candles, gourmet popcorn |
| Presentation | Visually appealing arrangement of items in the basket. | Using decorative fillers, ribbons, and creative placement |
The Benefits of Making Your Own
Making your own gift basket has several benefits.
- Personalization: You can tailor the gift basket to the recipient’s specific interests and preferences.
- Budget Control: You have complete control over the budget, allowing you to make adjustments as needed.
- Creativity: Creating a gift basket from scratch allows you to express your creativity and add a personal touch.
As someone who has made numerous Homemade Gift Baskets, it’s clear that the process allows for a level of customization that is hard to achieve with store-bought options. By choosing the items and presentation, you can create a truly unique Gift Basket Idea that reflects your relationship with the recipient.
“The best gifts are those that come from the heart and show that you’ve put thought into selecting something special for the recipient.”
Planning Your Gift Basket Strategy
Planning is key to crafting a gift basket that resonates with the recipient and makes a lasting impression. A thoughtful approach ensures that your gift is both personal and relevant to the occasion.
Identifying the Recipient and Occasion
Understanding who the gift basket is for and the occasion it’s intended for is crucial. This knowledge helps in tailoring the contents and presentation to suit their tastes and needs.
Considering Personal Preferences and Interests
When selecting items for your gift basket, consider the recipient’s personal preferences and interests. For example, if they enjoy gourmet foods, include specialty cheeses or artisanal chocolates.
Including items that reflect their hobbies or passions can make the gift even more meaningful.
Accounting for Dietary Restrictions and Allergies
It’s also important to be mindful of any dietary restrictions or allergies the recipient may have. This includes avoiding nuts if they have a nut allergy or opting for gluten-free products if necessary.
| Occasion | Common Dietary Restrictions | Gift Basket Ideas |
|---|---|---|
| Birthday | Vegetarian, Gluten-free | Fruit basket, Gluten-free baked goods |
| Holiday | Dairy-free, Nut-free | Dairy-free chocolates, Nut-free snacks |
| Get Well | Low-sugar, Organic | Organic teas, Low-sugar snacks |
Setting Your Budget
Determining your budget is a critical step in planning your gift basket. It helps you decide on the quality and quantity of items to include.
Allocating Funds for Container and Contents
Decide how much to allocate for the container and the contents. A more luxurious container might be worth investing in if it fits within your budget.
Finding Cost-Effective Options
Look for cost-effective options without compromising on quality. Consider shopping during sales or using coupons for the items you need.
Establishing a Timeline
Creating a timeline for assembling your gift basket ensures that you have enough time to gather all the necessary items and assemble the basket without rushing.
Choosing the Perfect Theme for Your Gift Basket
A well-chosen theme can elevate your gift basket from a simple collection of items to a meaningful gesture. By selecting a theme that resonates with the recipient’s interests or the occasion, you can create a custom gift basket that is both personalized and relevant.
Popular Gift Basket Themes
There are numerous themes to choose from when creating a gift basket. Some popular options include:
- Food and gourmet themes
- Spa and relaxation themes
- Hobby and interest-based themes
Food and Gourmet Themes
Food and gourmet themes are ideal for those who appreciate fine cuisine. Ideas include a coffee enthusiast basket, a cheese and charcuterie basket, or a baking basket filled with gourmet ingredients and recipes.
Spa and relaxation themes are perfect for promoting self-care and relaxation. Consider creating a spa day basket with scented candles, bath salts, and luxurious skincare products.
Hobby and Interest-Based Themes
Hobby and interest-based themes allow you to tailor the gift basket to the recipient’s specific interests. Examples include a gardening basket, an art lover’s basket, or a fitness basket filled with relevant items and accessories.
Personalizing Your Theme Selection
To make your gift basket even more special, consider personalizing the theme selection based on the recipient’s preferences and interests. This could involve incorporating their favorite colors, hobbies, or interests into the basket.
Color Scheme Coordination
Coordinating the color scheme of your gift basket can add an extra layer of thoughtfulness and visual appeal. Choose colors that complement the theme and the recipient’s preferences to create a cohesive and attractive presentation.
Selecting the Right Container
The foundation of a great gift basket lies in its container, which can range from traditional baskets to creative alternatives. The right container not only holds your carefully selected items but also enhances the overall presentation and theme of your gift.
Traditional Basket Options
Traditional baskets are a timeless choice for gift baskets. They come in various materials and styles, each offering a unique charm.
Wicker Baskets
Wicker baskets are a classic choice, known for their natural look and durability. They are versatile and can be used for a wide range of themes.
Wire Baskets
Wire baskets offer a modern and sleek alternative. They are particularly useful for themes that require a more contemporary look.
Wooden Crates
Wooden crates provide a rustic and earthy feel. They are ideal for themes that emphasize a natural or vintage aesthetic.
Creative Container Alternatives
While traditional baskets are popular, there’s a wide range of creative alternatives that can add a unique touch to your gift basket.
Decorative Boxes and Tins
Decorative boxes and tins can add an element of luxury and sophistication. They are perfect for themes that require a more elegant presentation.
Tote Bags and Reusable Containers
Tote bags and reusable containers not only serve as a container but also as a part of the gift itself, promoting sustainability.
Theme-Specific Vessels
Choosing a container that aligns with the theme can enhance the overall impact. For example, a tea-themed basket could be presented in a tea tin.
Size and Shape Considerations
The size and shape of the container are crucial. It should be appropriately sized for the items and visually appealing.
| Container Type | Ideal Use | Visual Appeal |
|---|---|---|
| Wicker Baskets | General gifts, food baskets | Natural, earthy |
| Wire Baskets | Modern themes, spa gifts | Sleek, contemporary |
| Wooden Crates | Rustic themes, wine gifts | Rustic, vintage |
When selecting a container, consider the theme, size, and material to ensure it complements your gift basket design.
Gathering Essential Materials and Supplies
Gathering the necessary materials is a crucial step in making a gift basket that looks professional and appealing. To start, you’ll need to collect a variety of supplies that will help you structure, decorate, and finalize your gift basket.
Structural Materials
Structural materials form the base of your gift basket, providing support and helping to create a visually appealing arrangement. These include:
Shredded Paper and Filler
Shredded paper and filler materials are used to add volume and fill empty spaces in your gift basket. They come in various colors and textures, allowing you to match them with your theme.
Tissue Paper
Tissue paper is another essential material used for wrapping items or adding a decorative layer. It’s available in a wide range of colors and can be used to create a cohesive look.
Cardboard Inserts
Cardboard inserts help to create separate compartments within your gift basket, keeping items organized and adding an extra layer of structure.
Decorative Elements
Decorative elements are what make your gift basket stand out, adding a personal touch and enhancing its visual appeal.
Ribbons and Bows
Ribbons and bows are classic decorative elements used to add a finishing touch to your gift basket. They come in various materials, such as satin, grosgrain, and organza.
Cellophane and Shrink Wrap
Cellophane and shrink wrap are used to wrap your gift basket, providing a protective layer while showcasing the contents. They can be used to create a neat and polished finish.
Decorative Accents
Decorative accents, such as flowers, greenery, or themed decorations, can be added to give your gift basket a personalized touch.
Wrapping and Finishing Supplies
Wrapping and finishing supplies are essential for completing your gift basket, ensuring it looks neat and professionally finished.
Adhesives and Tape
Adhesives and tape are necessary for securing various elements of your gift basket, such as ribbons or cellophane wrap.
Gift Tags and Cards
Gift tags and cards provide an opportunity to add a personal message to your gift basket, making it more special and thoughtful.
Here’s a summary of the essential materials and supplies you’ll need to create a beautiful gift basket:
| Category | Materials |
|---|---|
| Structural Materials | Shredded paper, filler, tissue paper, cardboard inserts |
| Decorative Elements | Ribbons, bows, cellophane, shrink wrap, decorative accents |
| Wrapping and Finishing Supplies | Adhesives, tape, gift tags, cards |
Curating the Perfect Items for Your Basket
Curating the perfect items for your gift basket is an art that requires a thoughtful approach. It involves selecting a mix of products that not only fit the theme or occasion but also appeal to the recipient’s tastes and preferences. This stage is crucial in creating a custom gift basket that is both visually appealing and meaningful.
Selecting Anchor Items
Anchor items are the centerpiece of your gift basket, setting the tone for the rest of the contents. They should be significant and relevant to the occasion or the recipient’s interests.
Choosing Statement Pieces
When choosing statement pieces, consider items that are unique, high-quality, and reflective of the occasion. For example, a gourmet food item or a luxurious candle can serve as a great anchor.
Determining Quantity and Variety
The quantity and variety of anchor items will depend on the size of your basket and the overall theme. A general rule is to have one or two main anchor items and then supplement with other complementary products.
Adding Complementary Products
Complementary products enhance the anchor items and add depth to your gift basket. They should be chosen based on how well they work together with the anchor items.
Creating Product Synergy
To create product synergy, select items that complement each other in terms of texture, color, and functionality. For instance, pairing a wine with gourmet cheese and crackers creates a cohesive and appealing gift basket.
Balancing Premium and Budget Items
A well-balanced gift basket includes a mix of premium and budget-friendly items. This balance ensures that the basket is not too expensive but still offers a luxurious feel.
Including Filler Items
Filler items are essential for filling gaps and adding volume to your gift basket. They should be chosen to enhance the overall aesthetic and theme.
Small Treats and Surprises
Small treats and surprises, such as chocolates or specialty teas, can add a delightful touch to your gift basket. They also provide an element of surprise for the recipient.
Practical Additions
Practical additions, like kitchen utensils or cozy socks, can add functionality to your gift basket. They make the gift more useful and appreciated.
By carefully selecting anchor items, adding complementary products, and including filler items, you can create a creative gift basket that is both beautiful and meaningful. The key is to have a thoughtful and balanced approach to curating the items in your basket.
How to Build a Gift Basket From Scratch — A Step by Step Guide
To craft a stunning gift basket, follow this comprehensive guide that breaks down the process into manageable tasks. Building a gift basket from scratch involves several key steps that ensure a visually appealing and well-structured final product.
Step 1: Prepare Your Container Base
Before adding any items, it’s essential to prepare the container base. This step lays the foundation for your gift basket.
Cleaning and Inspecting the Container
Start by cleaning the container thoroughly to remove any dirt or debris. Inspect it for any damage that might affect its appearance or stability.
Adding Weight for Stability
To prevent the basket from toppling over, consider adding weight to the base. This can be achieved by placing a heavy object or material at the bottom of the container.
Step 2: Create Height and Structure
Creating height and structure is crucial for a visually appealing gift basket. This step helps in achieving a balanced and harmonious arrangement.
Building a Foundation Layer
Begin by building a foundation layer using materials like crumpled paper or foam. This layer provides a base for your items and helps in achieving the desired height.
Using Crumpled Paper or Foam
Crumpled paper or foam inserts can be used to add height and fill gaps within the basket. These materials are versatile and can be adjusted according to the size and shape of your container.
Step 3: Position Your Anchor Items
Anchor items are the central pieces in your gift basket. Positioning them correctly is vital for creating a balanced arrangement.
Placing the Largest Items First
Start by placing the largest items first. These items will serve as the backdrop for your other gifts and help in establishing the overall structure.
Establishing the Back-to-Front Layout
When arranging your items, work from the back to the front. This approach ensures that the tallest items are at the back, creating a visually appealing gradient.
Step 4: Layer Additional Items
Once the anchor items are in place, you can start layering additional items. This step involves adding complementary products and filler items to enhance the basket’s appearance.
Working from Back to Front
Continue to work from back to front, adding items in a way that maintains the basket’s balance and harmony.
Varying Heights and Angles
To add visual interest, vary the heights and angles of the items. This technique prevents the basket from looking flat and monotonous.
Step 5: Fill Empty Spaces
Filling empty spaces is the final step in creating a full and lush gift basket. This step ensures that the basket looks complete and well-arranged.
Adding Smaller Items Strategically
Add smaller items strategically to fill any gaps. These items can be placed around the larger items to create a cohesive look.
Using Decorative Filler
Use decorative filler materials like excelsior or decorative paper to fill any remaining spaces. These materials add a finishing touch to your gift basket.
| Step | Description | Key Actions |
|---|---|---|
| 1 | Prepare Container Base | Clean and inspect the container, add weight for stability |
| 2 | Create Height and Structure | Build a foundation layer, use crumpled paper or foam |
| 3 | Position Anchor Items | Place largest items first, establish back-to-front layout |
| 4 | Layer Additional Items | Work from back to front, vary heights and angles |
| 5 | Fill Empty Spaces | Add smaller items strategically, use decorative filler |
Mastering Arrangement Techniques
The art of gift basket design hinges on the ability to arrange items in a harmonious and balanced way. Effective arrangement techniques can make a significant difference in the overall appearance of your gift basket.
The Triangle Method
The triangle method is a popular technique used in arranging gift basket items. It involves placing items in a triangular formation to create visual appeal.
Creating Visual Flow
To create a visual flow, start by placing the largest item at the base, followed by smaller items that form the sides of the triangle. This technique guides the viewer’s eye through the basket, creating a creative gift basket that captures attention.
Balancing Item Placement
Balancing item placement is crucial to avoid a cluttered or lopsided appearance. Ensure that the items are evenly distributed and that the basket looks balanced from all angles.
Creating Visual Balance
Visual balance is achieved when the arrangement of items creates a sense of stability and harmony. This can be accomplished by considering factors such as color, texture, and size, ultimately resulting in a custom gift basket.
Distributing Weight Evenly
Distribute the weight of the items evenly to prevent the basket from tilting or looking unbalanced. This also ensures that the basket is stable during transport.
Color Distribution Strategies
Use a thoughtful color distribution strategy to enhance the visual appeal. Consider using a mix of complementary colors or a monochromatic scheme to create a cohesive look.
Playing with Height Variations
Playing with height variations adds depth and interest to your gift basket. This can be achieved by using risers, supports, and layering techniques.
Using Risers and Supports
Risers and supports can be used to elevate certain items, creating a multi-level effect that adds visual interest to your gift basket design.
Layering Techniques
Layering involves placing items of different heights and sizes in a way that creates a visually appealing arrangement. Start with a base layer and build up to create depth.
- Pay attention to color and texture to create an eye-catching arrangement.
- Ensure that fragile items are securely placed to prevent damage during transport.
- Balance item placement to avoid a cluttered or lopsided appearance.
Adding Finishing Touches and Embellishments
The final touches on a gift basket can elevate it from a simple collection of items to a thoughtful and visually appealing present. This stage is crucial as it adds a personal and professional finish to your creation.
Wrapping Your Gift Basket
Wrapping your gift basket not only protects the contents but also adds an element of surprise and excitement for the recipient. There are several methods to wrap your gift basket effectively.
Cellophane Wrapping Technique
Gently pull the cellophane or shrink wrap over the top of the basket, allowing some excess to hang over the sides. Secure the wrap with tape or adhesive at the back of the basket. This method is simple and provides a clear view of the basket’s contents.
Box Method for Square Containers
For square or rectangular containers, consider using a box wrapping method. This involves placing the basket in a box or wrapping it in paper to create a neat, box-like appearance. It’s a great alternative for non-traditional basket shapes.
Adding Ribbons and Bows
Ribbons and bows are the crowning glory of a beautifully presented gift basket. They add a touch of elegance and can be customized to match the theme or occasion.
Tying the Perfect Bow
To tie the perfect bow, start by looping the ribbon into two equal parts. Cross one loop over the other, then wrap the ribbon around the center to secure it. Adjust the loops to make sure they are even and fluff out the bow to create a full, rounded shape.
Ribbon Placement Options
You can place ribbons around the handle of the basket, around the body, or even create a decorative bow to attach to the top. Experiment with different placements to find what works best for your basket.
Creating a Personalized Gift Tag
A personalized gift tag adds a thoughtful and personal touch to your gift basket. It can include the recipient’s name, a message, or a simple greeting.
Crafting Your Message
When crafting your message, keep it simple and heartfelt. Consider the occasion and the recipient’s preferences. A simple “Happy Birthday” or “Thank You” can be very effective.
Tag Attachment Methods
You can attach the gift tag to the basket using a ribbon, a small clip, or even a pin. Make sure it’s securely attached so it doesn’t get lost during transport.
To give you a better idea of the materials you might need, here’s a summary table:
| Material | Purpose | Options |
|---|---|---|
| Cellophane or Shrink Wrap | Wrapping the Basket | Clear, colored, or patterned |
| Ribbons | Decorative Element | Satin, grosgrain, or wired ribbons |
| Gift Tag | Personalized Message | Cardstock, pre-made tags, or handmade |

Securing and Stabilizing Your Gift Basket
A gift basket’s longevity and presentation depend significantly on how well its items are secured and stabilized. Ensuring that your gift basket remains intact from creation to delivery is crucial for making a lasting impression.
Securing Loose Items
One of the key challenges in gift basket creation is keeping the items from shifting or falling out during transport. To address this, you can employ several techniques.
Using Clear Adhesive Dots
Clear adhesive dots are a discreet and effective way to secure items within your gift basket. These dots are nearly invisible, making them ideal for delicate or high-end gift baskets where appearance is paramount.
Wire and Floral Picks
Wire and floral picks can be used to anchor items to the base of the basket or to each other, providing stability and preventing movement. This method is particularly useful for gift baskets containing fresh flowers or fragile items.
Ensuring Safe Transport
Beyond securing the items within the basket, it’s also important to consider how the basket itself will be transported.
Wrapping for Stability
Wrapping your gift basket in cellophane or a decorative wrap not only adds to its visual appeal but also helps to keep the contents secure. This wrapping can be done in a way that supports the structure of the basket and prevents items from shifting.
Carrying and Delivery Tips
When carrying or delivering your gift basket, it’s essential to handle it with care. Holding the basket by its base or handle, rather than the wrapping or decorative elements, can help prevent damage.
To further illustrate the importance of securing and stabilizing gift baskets, consider the following comparison:
| Method | Effectiveness | Aesthetic Impact |
|---|---|---|
| Clear Adhesive Dots | High | Low (nearly invisible) |
| Wire and Floral Picks | High | Medium (can be visible but can be arranged to be less noticeable) |
| Wrapping for Stability | Medium to High | High (adds to the visual appeal) |
Creative Gift Basket Ideas by Occasion
Whether it’s a holiday, birthday, or corporate event, a well-curated gift basket can convey thoughtfulness and appreciation. The key to creating a memorable gift basket lies in understanding the occasion and tailoring the contents accordingly.
Holiday-Themed Baskets
Holiday-themed baskets are a great way to celebrate special times of the year. They can be filled with items that are relevant to the holiday, making them a thoughtful and festive gift.
Christmas and Winter Holiday Baskets
For Christmas and other winter holidays, consider baskets filled with hot cocoa mix, gourmet cookies, and cozy throw blankets. These items evoke a sense of warmth and comfort during the cold winter months.
Easter and Spring Celebration Baskets
Spring and Easter baskets can include pastel-colored candies, fresh flowers, and gardening tools. These items symbolize renewal and the joy of the season.
Birthday and Celebration Baskets
Birthday and celebration baskets are perfect for marking important milestones and special occasions. They can be personalized with the recipient’s favorite treats and drinks.
Milestone Birthday Ideas
For milestone birthdays, such as 30th, 40th, or 50th birthdays, consider baskets that include items related to the person’s interests or nostalgic items from their past.
Anniversary and Wedding Baskets
Anniversary and wedding baskets can be filled with champagne, chocolates, and other romantic treats. These baskets are a thoughtful way to celebrate love and commitment.
Corporate and Professional Baskets
Corporate gift baskets are an excellent way to show appreciation to clients and employees. They can be tailored to fit the company’s brand and culture.
Client Appreciation Baskets
Client appreciation baskets can include gourmet food items, wine, and other luxury goods. These baskets help to build strong business relationships.
Employee Recognition Baskets
Employee recognition baskets can be filled with items that promote relaxation and wellness, such as scented candles and spa gift certificates. These baskets show appreciation for employees’ hard work and dedication.
Common Mistakes to Avoid When Building Gift Baskets
To make a gift basket that truly impresses, it’s crucial to steer clear of common mistakes that can detract from its appeal. Building a gift basket can be a thoughtful and creative process, but certain pitfalls can make it less effective.
Avoiding these mistakes ensures that your gift basket is not only visually appealing but also functional and appreciated by the recipient. By being mindful of these potential issues, you can create a beautiful and well-received gift.
Overcrowding the Container
One of the most common mistakes is overcrowding the gift basket. When too many items are packed into the container, it can look cluttered and disorganized.
Finding the Right Balance
Balance is key when it comes to arranging items in a gift basket. You want to ensure there’s enough space between items for a clean and visually appealing presentation. To achieve this, start by placing your largest or most significant items first, and then fill in the gaps with smaller items.

Poor Color Coordination
Another mistake is poor color coordination. Using colors that clash or don’t complement each other can make the gift basket look unappealing.
Clashing Colors and Patterns
To avoid this, select a color scheme that complements the occasion and the recipient’s preferences. Stick to a few core colors and use them consistently throughout the basket. Avoid mixing too many patterns or bright colors that can create visual chaos.
Ignoring Presentation Quality
The presentation of your gift basket is just as important as its contents. Ignoring the quality of presentation can make an otherwise great gift look sloppy.
Sloppy Wrapping
Ensure that any wrapping or packaging is done neatly and securely. Use appropriate wrapping materials that complement the theme and protect the items inside.
Mismatched Theme Elements
Make sure all elements of the gift basket match the chosen theme. This includes the container, the items inside, and any decorative elements. Consistency is key to a well-presented gift basket.
Neglecting Item Security
Finally, neglecting to secure items properly can lead to damage during transport. Ensure that all items are securely placed and won’t move around during handling.
By avoiding these common mistakes, you can create a DIY Gift Basket or Homemade Gift Basket that is both beautiful and functional, making it a truly appreciated gift.
Budget-Friendly Tips for Custom Gift Baskets
With a little creativity, you can craft a stunning gift basket without breaking the bank. Creating a custom gift basket on a budget requires some planning and resourcefulness, but the results can be truly rewarding.
As emphasized by gift basket experts,
“A stunning gift basket doesn’t have to break the bank. Here’s how to make a gift basket look expensive even when it’s not: Focus on quality over quantity, Use a premium container, Stick to a consistent color scheme, Wrap the basket in clear cellophane and tie it with a nice ribbon, Add a personalized gift tag.”
Shopping Smart for Materials
One of the key strategies for creating a budget-friendly gift basket is shopping smart for materials. This involves being mindful of where and how you spend your money.
Dollar Store Finds
Dollar stores can be a treasure trove for DIY Gift Basket materials. You can find affordable decorative items, containers, and even some gift items. For instance, using a decorative vase or a nicely designed mug from a dollar store can add a touch of elegance to your Homemade Gift Basket without the hefty price tag.
Bulk Buying Strategies
Buying items in bulk can significantly reduce the cost per unit. Consider purchasing snacks, candies, or other non-perishable items in larger quantities. This not only saves money but also ensures you have supplies for future Gift Basket Ideas.
Repurposing Household Items
Before buying new materials, consider what you already have at home. Old baskets, jars, or decorative boxes can be repurposed as unique containers for your gift baskets. This approach not only saves money but also adds a personal touch to your gift.
Timing Your Purchases
The timing of your purchases can greatly impact your budget. Keeping an eye on sales and discounts can help you save significantly.
Post-Holiday Sales
Many retailers offer deep discounts on gift-related items after holidays. Stocking up during these sales can provide you with materials for future gift baskets at a fraction of the cost.
Seasonal Discounts
Seasonal items are often discounted at the end of their respective season. Purchasing seasonal-themed items during these sales can be a cost-effective way to create themed gift baskets.
By implementing these budget-friendly tips, you can create beautiful and meaningful gift baskets that don’t strain your wallet. Remember, the thought and effort you put into creating a gift basket are what truly matter, not the price tag.
Conclusion
Creating memorable gift baskets is a thoughtful way to celebrate occasions and show love. By following this step-by-step guide on How to Build a Gift Basket From Scratch, you can create a beautiful and meaningful gift. This Gift Basket Tutorial has covered the essential elements, from planning to presentation.
With a little creativity, you can turn a simple basket into a DIY Gift Basket or a Homemade Gift Basket that reflects your personal touch. Experiment with different Gift Basket Ideas and Gift Basket Design to find what works best for you.
Whether you’re creating a Creative Gift Basket or a Custom Gift Basket, the key is to have fun and be thoughtful in your selection and arrangement of items. This guide has provided you with the tools to make a lasting impression with your gift.